Saturday, October 21, 2017

Puzzle pieces or boxes in power point 2016, 2013

To see this Puzzle or Maze boxes effect on PowerPoint follow the below steps:


STEP1:

Open Power point, click on HOME tab and select LAYOUT > BLANK


STEP2:
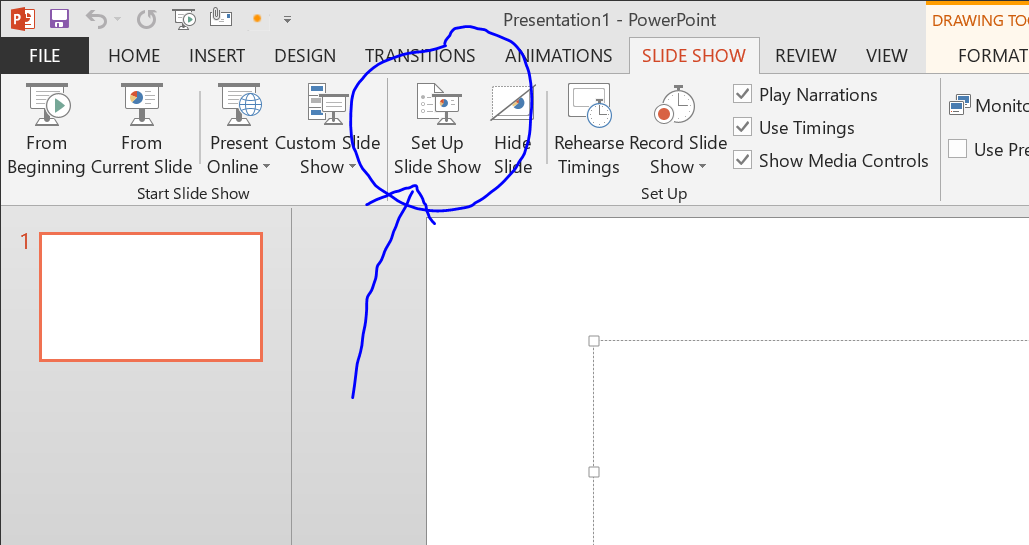
Go to INSERT > ILLUSTRATIONS > SHAPES > select RECTANGLE shape from RECTANGLES


STEP3:
Now hold SHIFT key on your keyboard and draw a rectangle on the power point stage so that you see a square shape instead of rectangle shape, similarly draw a circle and vertical shaped rectangle as shown in the below image.


STEP4:
Now select all the three shapes and give the OUTLINE as NO OUTLINE from SHAPE OUTLINE drop-down menu from HOME menu


STEP5:

  • Now merge CIRCULAR shape and RECTANGULAR shape using MERGE option from FORMAT menu by placing both the shapes as shown below in the first image.
  • Secondly, to get the second shape, place the first shape on the SQUARE shape by changing the rotate option to left 90 to the first shape and then go to FORMAT > MERGE SHAPES > SUBTRACT
  • Finally, place the first shape on the top of the newly created second shape to get the third shape. To achieve this go to FORMAT > MERGE SHAPES > UNION    


STEP6:
Now duplicate the third shape in to three more shapes and arrange them as shown in the below first image and then bring them close to each other to modify as a square with SHAPE OUTLINE as White background from SHAPE OUTLINE by selecting all the 4 shapes


STEP7:
Now select each SHAPE and give color for each shape as per your requirement and then select all four shapes and right click on it and GROUP and then select GROUP


STEP8:
Now it’s time to convert this shape to 3D by just right clicking on this shape fill the following properties

  • 3-D ROTATION: PRESETS > PERSPECTIVE: CONTRASTING RIGHT
  • 3-D FORMAT:
    • TOP BEVEL: ANGEL
    • BOTTOM BEVEL: ANGEL
    • DEPTH: WHITE
    • CONTOUR: BLACK
    • MATERIAL: DARK EDGE
    • LIGHTING: CHILLY.
  • REFLECTION: PRESETS > FULL REFLECTION: 4 POINT OFFSET


STEP9:
By this we can see the desired output on PPT as well as we can save this slide as PNF file by clicking on FILE menu and SAVEAS and browse where to save and select the PNG PORTABLE NETWORK GRPAHICS FORMAT (*.png) file format from the drop-down menu SAVE AS TYPE.

*******************************************************************************

If you have any questions about this topic please post your comment I try to address your questions ASAP.

*******************************************************************************

To have more details on this topic please watch my you-tube channel:


*****************************************************************************

Friday, October 13, 2017

How to remove the underline for a hyperlink in POWER POINT 2016

  • Open PowerPoint and right-click the hyperlink text, and then click Remove Hyperlink.
  • Go to the Insert tab, in the Illustrations group, click Shapes, and then under Rectangles, click Rectangle.
  • Drag Rectangle shape to draw the rectangle so that it covers the hyperlink text that you want to remove the underline
  • Right-click the shape rectangle, and then click Format Shape.
  • In the Format Shape pane, do the following:
    • Under Fill, select No fill.
    • Under Line, select No line.
  • Click on the rectangle shape (but not the text inside of the shape), and then on the Insert tab, in the Links group, click Hyperlink.
  • In the Address box, type the Web address, and then click OK
  • Click the text (Which is covered with hidden rectangle) that contains the hyperlink.
If you have any questions about this topic please post your comment I try to address your questions ASAP.

*******************************************************************************

To have more details on this topic please watch my you-tube channel:


*****************************************************************************

How to run or show multiple slideshows in POWER POINT 2016.

This is how you can run two different power point slideshows on a single monitor at the same time (without either pausing!)

  1. Open your first power-point file and click the Slide Show tab on the ribbon
  2. Click on the menu option "Set Up Slide Show
  3. Under "Show type" click "Browsed by an individual (window)"
  4. Click OK button.


Repeat the same steps mentioned above to the second power point file too. Once you are done with updating the settings.

Open any one of the power point file and go to "View" menu and click on the "Arrange All" option so that both the Power-point files will be arranged side by side automatically. Once those are arranged side by side then try to run the slide show on each power point by just hitting F5 button on your keyboard or by selecting the option "From beginning" under "Slide Show" menu manually.

Then finally, you see the magic of the power point where the slide show will not be the full screen like earlier, now it will be half of the screen (In individual window) and repeat F5 for the other Power point file too. By doing this we can see two slide shows on a single screen at a time.

*********************************************************************************
Please place your comments below if you have any questions. For more details on this topic please watch the below video on my YouTube Channel and don't forget to subscribe it.

********************************************************************************


Wednesday, October 4, 2017

How to create a round corner image for a square shaped image or rectangle shape image using POWER POINT 2016:

  • Let us assume here is the square shape image and we want to make the image corners to be rounded. To do that follow the below mentioned steps:
    For instance let us assume the below image to be changed to rounded corner image.
  • Open Power point and insert a ‘Rounded Rectangle’ shape from the ‘HOME’ tab ‘SHAPES’ menu
  • Right Click on the rounded rectangle shape and click on the ‘FORMAT SHAPE’
  • Select the fourth option ‘PICTURE OR TEXTURE FILL’ and then click on the button ‘FILE’ below to select the image for which you want to make corners rounded instead of straight edges.
  • Once you click on the ‘FILE’ button and browse for your image on your laptop and then click the Insert button to see the wonderful round cornered image ready to use in your Power Point presentation.

Due to some technical issues on this blogger platform, the above showing round corner image is showing up with some white edges but if you would like to see the correct output just download the above rounded image on to your desktop and see in your Image viewer software to see the exact rounded corners image.

********************************************************************************

To have more details on this topic please watch my you-tube channel:


If you have any questions about this topic please post your comment I try to address your questions ASAP.

********************************************************************************